How to Send A Pre-Authorization
Purpose: This guide provides step-by-step instructions for creating and transmitting a pre-authorization (Pre-Auth) for a patient's treatment plan.
Step 1: Create the Pre-Authorization
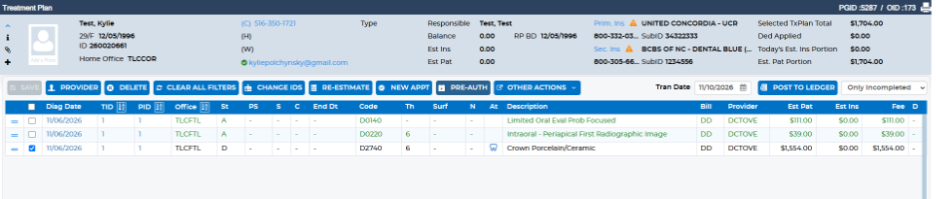
- Open the patient's Treatment Plan.
- Select the applicable procedures that require pre-authorization.
- Select "Pre Auth."
IMPORTANT: Make sure the correct provider is selected BEFORE creating the pre-authorization.
Step 2: Select Attachments
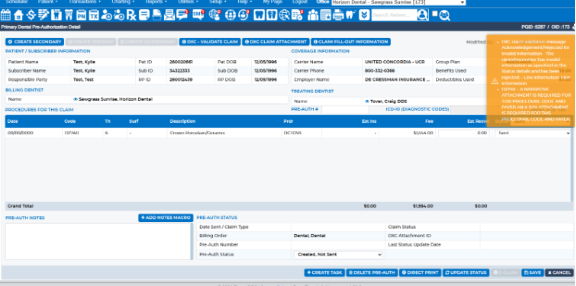
Once the Pre-Auth window opens:
- Select the applicable attachments needed to support the pre-authorization.
- If applicable, create a pre-authorization for the patient's secondary insurance.
- Review your selections to ensure everything is correct.
- Once completed, select "Save."
Step 3: Transmit the Pre-Authorization
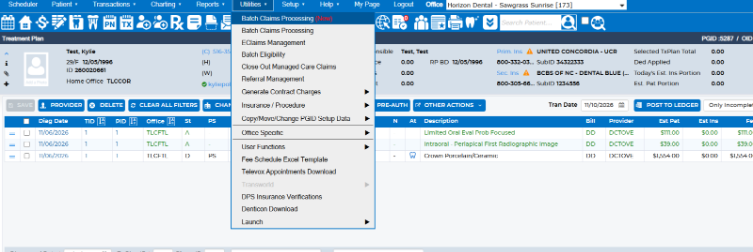
After selecting Save, you will be redirected back to the patient's Treatment Plan.
To transmit the pre-authorization:
- Navigate to Utilities.
- Select Batch Claim Processing New.
- Locate the pre-authorization(s) listed in the window.
Step 4: Review and Transmit
The pre-authorization for the patient's primary insurance and secondary insurance (if applicable) will appear here.
Similar to submitting regular insurance claims:
- Review the pre-authorization details.
- Attach any additional documentation needed.
- Once everything is ready, select "Transmit Claims."

Step 5: Verify Submission in EClaims Management
After transmitting, navigate to EClaims Management to verify the status of the pre-authorization.
The pre-authorization will display one of the following statuses:
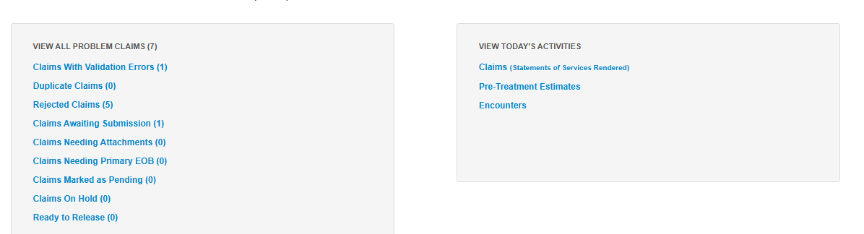
- Submitted: The pre-authorization has been successfully transmitted and will be shown under "Pre-Treatment Estimates"
- Additional Key Details Needed: Additional information is required before the pre-authorization can be processed and will be shown under "View All Problem Claims"
Important Reminders
- Always verify that the correct provider is selected before creating a pre-authorization.
- Make sure all applicable attachments are included.
- Remember to create a secondary insurance pre-authorization if applicable.
- Saving the pre-authorization does NOT complete the submission process.
- Always transmit through Utilities → Batch Claim Processing New.
- Verify the submission status in EClaims Management.
TIP: Creating and saving a pre-authorization is only the first part of the process. You must also transmit it through Batch Claim Processing New and verify its status in EClaims Management.
How to Enter a Pre-Authorization
This guide provides step-by-step instructions for entering an insurance pre-authorization determination into the patient's treatment plan.
Step 1: Navigate to the Pre-Authorization List
Once the pre-authorization has been returned from the insurance company:
- Open the patient's Overview.
- Navigate to Transactions.
- Select Pre-Authorization List.
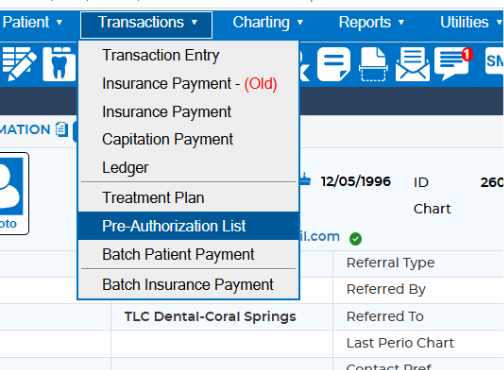
Step 2: Open the Applicable Pre-Authorization
- Locate the applicable pre-authorization.
- Click on the pre-authorization to open it.

Step 3: Enter the Insurance Determination
- Change the pre-authorization status to match the determination received from the insurance company.
- Enter the estimated insurance amount provided by the insurance company, if applicable.
- Review the information to ensure everything is correct.
- Once completed, select "SAVE."
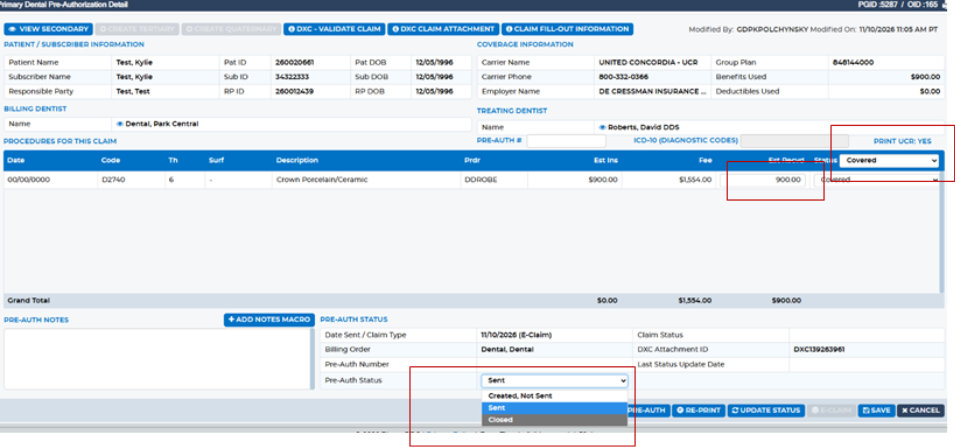
Once saved:
- The pre-authorization will show as CLOSED in the Pre-Authorization window.
- The insurance determination and applicable estimate will be reflected in the patient's Treatment Plan.
- PS (Pre Auth-Sent) will change to PC (Pre-Auth Closed) in the patient's treatment plan.

Helpful Reports
How to Follow Up on Pending Pre-Authorizations in Denticon
To view and follow up on any pending pre-authorizations:
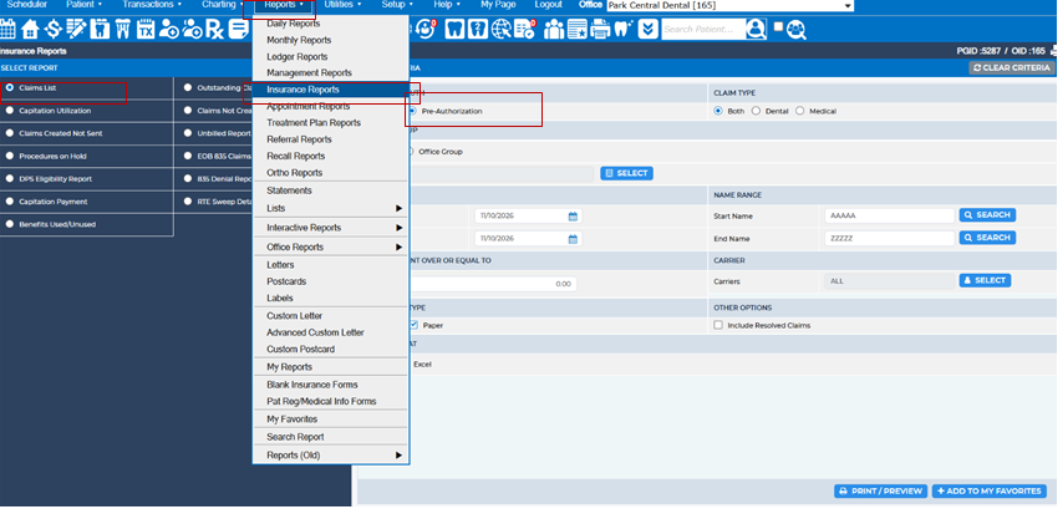
- Navigate to Reports.
- Select Insurance Reports.
- Open Claims List.
- Select "Pre Authorization" as the claim type.
- Select the applicable Date Range.
- Run the report to view pre-authorizations and identify any outstanding items that may need follow-up.
Tip: Use this report regularly to monitor pending pre-authorizations and help ensure timely follow-up with insurance companies.
Was this article helpful?
That’s Great!
Thank you for your feedback
Sorry! We couldn't be helpful
Thank you for your feedback
Feedback sent
We appreciate your effort and will try to fix the article